Tuesday, April 3, 2018

Easter Dinner 2018

What an amazing Easter we had.  We had our normal morning with the kids.  We did the egg hunt and looked at all the stuff the Easter Bunny left us.  Then it was time to get busy working on dinner only to have it end with a fun family gathering. I truly hope all of you were just as blessed this Easter as we were.
If you followed my blog posts regularly you will see that my last 2 weeks of March were pretty much consumed with Easter Dinner Prep and I know most of you think I'm probably crazy and are wondering why I would put so much effort into a dinner.  Well, simple I love nothing more then spending time with family on holidays or actually any day for that fact.  I also love to decorate and create.  So the need to make it as nice as possible was actually a lot fun for me.
That is one of the reason why when my mom offered up the opportunity for us all to host a holiday at our houses now that are all grown with families I jumped at the opportunity to host a dinner.  Honestly, maybe I was even a bit bossy and told each of us which holiday we were getting but really it was just because I wanted a holiday at my home the worst way.  I chose Easter Dinner for myself, my brother and his wife got Thanksgiving, my Sister already has a huge 4th of July celebration so no point making her do extra with another holiday and my Mom still does Christmas for tradition.  I'm sure someday with my Sister being the Oldest  of us she will inherit Christmas if she wants.  Her family will most likely be the first to have the families great grandchildren anyway.
Our kids coloring this years Easter Eggs are the "Youngest" of the grandchildren even though they are not as young as they were 6yrs ago when we started hosting Easter Dinner at our house.
Wondering why I chose to do Easter?  It just made sense for us to do at our house.  We have the youngest of the grandchildren and lots of space for the kids to go egg hunting, they could be home to play with their toys and just enjoy themselves while us "older folks" enjoy uninterrupted conversation.  The kids are older now but has been a blessing for them to enjoy Easter home all these years so it was well thought out and has worked well for us. 
Also we raise our own pigs, since I was a kid we have always had a ham for Easter Dinner.  With that and the canned goods from the garden the food part is covered for a yummy spring feast here.  Plus having it all homegrown is just the best taste and feeling one can have at a nice family dinner.
We are also lucky enough to have a huge house to fit everyone in comfortably.  This is including the Hubby's family too as Easter is the one holiday that some of the his side of the family can make it to this is the holiday we wanted most.
Obviously, I tend to overdecorate or overdo everything depending on how you look at it in the decorating department.  Honestly, look at the table displays below even the kids table is fancied up.  I made almost all of it from the Bunny Napkins the new Place Mats just for dinner so you can imagine how the rest of the Easter Decorations must look around here.  With us living tucked back in the woods and rarely visitors this is one way I can show it off to everyone. 
Really, Easter dinner was the perfect fit for us and it has worked out great every year since.


This year we had 20 guests make it to dinner and 8 more that were invited who were unable to attend due to other obligations and living farther away.  It was just the best feeling having everyone here enjoying themselves for dinner.  Unfortunately my oldest Niece and Nephews were unable to make it for dinner.  While it is sad it is to be expected, they are no longer children and some day they too will be deciding who is hosting which holidays I'm sure.  But as sad is was to not have them join us it was just a extra blessing to have the Hubby's 80+yr old Uncle and his Aunt here for dinner this year.

Almost all 20 of our guest made this photo, guess next year we make a mandatory group photo.
And while everything looked nice, the guests were all having a great time and it was turning out to be the "perfect" as possible Easter Dinner we still had an "oops" in the food department.  No it was not the ham as that turned out great, it looked great and tasted even better and it made the prefect tasting best gravy I have made yet (so wish I had snapped a picture of it) the oops came in the from of the turkey.  Why a turkey too? The Oldest Daughter who helped so much with the Easter Prep does not eat ham so we decided to make her a small turkey to enjoy something other then potatoes for dinner as a thank you....

......OOPS.  Do you notice something strange with this turkey?  While I was busy setting up the ham in one roaster the Hubby was helping get the turkey in the electric roaster.  Yes, I did instruct and watch him as he removed the bag from the turkey and the neck prior to rinsing it out and cooking it so I was a bit dumbfounded when I saw this when we went to carve it.  Neither of us looked inside the bird as I was not intending to stuff it.  It was just supposed to be extra and a treat for the Oldest Daughter who helped so much.  Knowing I had witnessed the removal of what I though as the giblets only left me left me wondering where did this come from?  Well after much debate and then searching for the previously removed bag (yes in the trash) we found out that the bag was not the giblets but rather a gravy for the bird.
OOPS!  We all got a good laugh out of it and the turkey was delicious just the same.  With only a few scraps of dark meat and one wing left of what was intended as an extra meat at dinner I'm going to assume no one was bothered by our "oops" at all.
So yes we had an oops but despite that I still have to say this has been one of the best Easter Dinners we have hosted yet.  Having both families here for dinner is just the best feeling one can ask for.  I have to admit I did miss all the little kids that used to be here running around just a few short years ago but everyone is growing up so it is to be expected.  I can only hope that Easter Dinner will be just as special when the next generation of little kids are running around collecting eggs hearing the story of how we cooked the turkey with the giblets still inside.

Thursday, March 29, 2018

Easter Dinner Prep

With the end of March only 2 days away we are in deep Easter Dinner Prep here.  The Ham and Turkey (we have a lot of guests coming so we are going with variety) are both defrosting, all the yummy food is just waiting to be cooked and as of today the table setting are all set to go as well.
Pastel yellow, pink, blue and purple is what will be on the tables for Easter Dinner.  Oh and flowers they are a must!
While Easter is officially in April, Easter Dinner prep is ending out what was already a very busy month of March for the Bull Family.   Thankfully all the stuff that involved us running nonstop happened earlier in March so we could be home working on last minute stuff these last two weeks.  You can read about our early March Madness in my March 19, 2018 review post but if you are here to read about all the fun stuff we did for Easter Dinner keep on scrolling below.

Our Easter Bunny 
We actually decorated for Easter the day after St. Patrick's Day but we had yet to put out our Easter Bunny so that had to be first on the list of Easter Prep.  This bunny has been a decoration here since we lived her and a must for Easter and the Bull Family.  I know he is starting to look "ratty" but to us he is perfect.  Be sure to click on the picture and see why he is so special to us.

New napkins for Easter Dinner.
Cloth napkins are the way to go for the Bull Family and we have been using them for around 6years now.  With at least 20 guest coming to dinner we definitely did not have enough napkins for Easter dinner so when I set out to make a new spring table cloth to welcome in the first day of spring I just made up a bunch of napkins too.  Wondering why the switch to cloth napkins? You can read why we made the switch at Napkins Save Money.  Yes, it was definitely worth the switch and not just to save money but we have also saved a ton of waste as well in these 6yrs.

Bunny Napkins
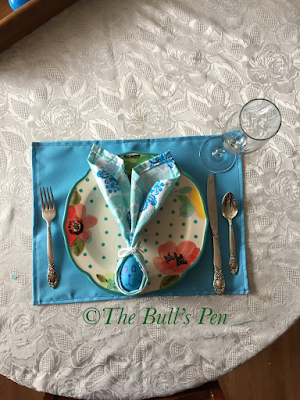
We may now have enough napkins for all our dinner guest but they sure as heck didn't match.  Some ended up a bit small due to fabric size and there were a variety of colors so to help keep them all "matching" the Oldest Daughter came up with making Bunny Napkins.  So cute and so easy, they are just going to look great on the tables, adding fun and color too.

Quick Easy Place Mats
And since I had already sewed a bunch of stuff to help make Easter Dinner more fun I figured might as well keep going with some Quick Easy Place Mats.  These place mats are just as they are described, quick and easy.  Anyone could make them and they are going to just make the table setting so nice for Easter Dinner.  Even better there will be no more guessing whose spoon is this game now.


And we close out the table prep with today's pastel yellow table cloth and flower purchase.  I'm sure you are all seeing that centerpiece and nice table cloth in the picture that is behind the flowers and table cloth and your probably wondering why the need for the new ones?  Simple the centerpiece is made from antique/vintage decorations and I would prefer they not get broken.  They will be put up before dinner.  The fake flowers in the very old vase are just too tall for diner conversation.  We would practically have to stand up or lean over to not feel like we are talking to them.  The tulips I purchased were intentionally short to keep them below face level.  Besides I just think every Easter Dinner should have real flowers on the table, the pretty smell makes all the delicious food taste that much better.
As for the table cloth, I chose the yellow table cloth to help pull the colors out of the other napkins and all the blues of the place mats should work nicely with it as well and its plastic because I do not have a yellow cloth one.  Also the pretty white table cloth in all the photos, that belonged to my Grandma and as much as I would love to have it out for Easter Dinner and enjoy all the Easter Memories of her I would be crushed if something was to happen to it so that too will be replaced with plastic for dinner.  Guess sewing table clothes will have to be on next years Easter Prep.
All that is left now is to just wait on the Easter Bunny and for it to be time to cook all the delicious food.  Myself, I'm looking forward to the dessert tray and all the springtime treats.

Wednesday, March 28, 2018

Quick Easy Place Mats

With yesterday being a go nowhere, do nothing and enjoy the first day of Spring Break day I decided to enjoy the afternoon at the sewing machine.  Why because I enjoy sewing and we needed about 20ish place mats for Easter dinner.  Well really we did not "need" them but to make it all look nice we wanted them.  With all the extra dinner prep I have done this last 2weeks like making all new napkins for everyone, coming up with the Bunny Napkins, decorating for Easter and I even purchased all new matching plates for everyone I really did not need to make place mats too but I wanted to sew and figured they would just help pull it all together.
The "need" part of them is that while we have a dining room large enough to fit two large tables and all 20 of us in here we are limited to movement once we are set for dinner.  The food is done buffet style in the kitchen and not placed on the tables as its easier than trying to pass dishes between 20guests (some that are children) and between tables.  Because of this the plates also need to be in the buffet area (kitchen).  The Oldest Daughter is determined to have each place setting (minus the plate) set at the table so what a better way to set up then on a place mat.  This will also help avoid the confusion of whose spoon is whose.

To make the process quick I chose to do just a single layer place mat and not doubled or lined.  To make them functional and durable mats I did use heavier canvas fabric and not thinner cotton material.  Since I only had to sew straight lines its also a very easy sew project that even beginners could do. Literally from start to finish and making 24 mats I was less then 2hrs.  That included some ironing at the end and the breaks needed to help the kids with stuff too.  It literally is the "quick and easy" project its described as.

Want to make some for yourself?  Here is what you need.
Canvas fabric, sewing machine, thread, measure tape or template and scissors.

You can measure out your mats to any size that works for you.  Myself I just placed an existing mat on the fabric and cut it a bit bigger (I did not measure) all the way around.

Once you have them all cut you can start sewing the seams on them.  Because I used canvas material and it tends to unravel I did a double folded seam on edges to help prevent this.  I did not iron my folds but rather just ran my fingers down the folds.  If it helps you to iron the seams please feel free to do so.  Also I did not pin the fabric prior to sewing the seams, again if this helps you please do so.

Once I completed all 24 mats I did go though and iron each one to take out any wrinkles and to press the seams down.  I do have to say I love how they turned out.  With all the fun projects I have done for Easter dinner this year I just can not wait for the day to get here so we can all enjoy them.


Tuesday, March 27, 2018

Our Easter Bunny

The story of Our Easter Bunny and his tradition here.

Wile the snow and yuckieness of a slow snow melt are not doing much to enhance the beauty of his surroundings I'm happy to say that our Easter Bunny turned 12 this year.  Time did take a bit of a toll on him over the years but considering all the weather he has withstood and lack of real care put into storage of him in his off seasons I have to say he is doing pretty good. We have had to reattach his arm and the cheap acrylic paint I used all those years ago is fading now but back when I made him I never would have guessed that he would become such an important tradition here.
Its hard to believe we have had this guy as long as we have lived here.  I remember being pregnant with the Oldest Daughter (who was born in May) and putting out the few small decorations I had for Easter thinking we had such a big house and I was finally able to put stuff out in my own yard and now I had no real decorations for Easter.  I was determined to make something I had no idea what but something.  We had just moved here in February and we really did not have a lot of "supplies" to work with like we do now but I went to the basement and searched till I found a few small pine boards and a four foot section of 2x12 that was left by the previous owners.  I really had not idea at that time I was making our Easter Bunny but after staring at the few materials I had for a bit making an Easter Bunny was all I could come up with.
His size is that of the actual piece of board I found.  All I did was cut his head and ears to shape at the end of it.  His arms are from a small piece of board that I just cut in half and rounded the ends.  His bow tie, pocket and the grass were all just pieces of smaller boards.  The pink, blue and yellow paint was actually the same paint that was left over from when I painted the nursery making him even more special to me.  That same paint is also the reason he has never gotten a touch up painting, I just cant bare to paint over it.
Each year Easter comes and goes and the kids love to see him out there welcoming in Easter.  At first to them he was just a decoration we put out each year but now after all these years he is part of a special tradition to have out for them as well.  Until this year I don't think any of us realized just how old or important of a decoration he had become to us.  I'm sure that the previous owner never thought these pieces of left behind wood would have every become the next owners cherished memories but they have.  Honestly, on the day I made him I really had no idea how much he would mean to us as the years went by either.  I can tell you now though that it's just not Easter without our Bunny out there. 

Friday, March 23, 2018

Meat Birds


So do we have the time to raise them or not this year?  That is the question when it comes to meat birds.  We know we want to and we know what they will be once grown (dinner) but sometimes we just don't have the time to put into them they need and finding time to process them in the end.  But when we do its so worth it.

The first few years we went big and got 12 thinking we would have at least one big chicken dinner a month.  That didn't happen, by the time it was done we only had 6 birds left to process.  I'm not sure why.  I guess it could have been a bad year or it could have been bad a bad hatch who knows.  Oh and cooking a big chicken dinner in August's heat that is just not happening.  So we have scaled down to only six a year and last year we were so busy we did not even raise them.  We were sorry, really missed those delicious dinners so they were back on the "menu" this year.


This year we only went with 6 and we will see how it goes from there.  I would love to say we will end up with 6 wonderfully healthy dinners but one can only guess at the outcome when they are tiny chick.....Not like meat birds are ever tiny chicks but you get the idea.

So after my New addition for 2018 post I was asked by a reader if it is hard to eat something you have raised up for a chick?  For that I can only say, not for us as we know that is why we have them.  Is it hard to process them?  Not for the Hubby he knows what he is doing and has done it multiple times prior to us raising them on the farm he worked on years ago.  However, I will admit I don't help do that part and not so much because I would fell bad but because I really don't like the whole blood and feathers thing.  The kids on the other hand would sit right there and watch all day.  I guess we all know how well these animals were treated and what their purpose was from the beginning so it only make sense to us, if that makes sense.  I guess its pretty much the same as when we raise the pigs the same all applies again.


This is the other part of the cropped photo above.  I call it "eggs and bacon" and or "breakfast" even though we have never had a meat bird laying eggs it just seem like a good name for it.  The year of this photo was also the last year we raised meat birds and I happily welcome them back to the menu this year.  I would even be into roasting one up mid August if I had to :)

Bunny Napkins

So we have 20 or so guests coming to dinner for Easter and now they all have pretty new napkins for Easter dinner too.  That was the easy part I just got out the fabric and the sewing machine and presto everyone had a new napkin in about an hour and a half.  The problem we had is that we do not have enough matching napkins whether it be size or color they were all just a little different.   With the Oldest Daughters help we came up with an easy solution to make the mismatched become a matching set and it only took seconds and literally no supplies.
These bunny napkins are just prefect for Easter dinner.  They add fun to the table for both grownups and children.  They nicely pull all the mismatch colors together in a cheerful table display with the variety of colors of both with all the eggs and napkins.  Honestly it really makes it look like we planned it out that way but really we did not.
*disclosure- I did not iron my napkins for this project as honestly I'm not a big ironing kind of person.  I just used the folded lines to help me find the center of the napkin, if you would prefer to iron please feel free to do so.


Thinking about adding this fun touch to your table?  Here is all you need and some simple step by step instructions to help you out.

Step 1:  Get your supplies ready.
1 napkin (we prefer cloth but paper would work too I suppose).
1 clean plastic egg.
1 string or ribbon
1 permanent marker
1 clothespin (optional)

Step 2: Draw the bunny face on your plastic egg and allow to dry.  I recommend a permanent marker so it will not smudge on your napkin.  If you want to add a treat inside the egg for the dinner guest such as a candy or a trinket you should do it at this time too.

Step 3: Lay out your napkin flat with the wrong side facing up (see images below)
right side up incorrect 
wrong side up correct way

Step 3:  Fold opposite corner to meet in the center so the right side is now beginning to show.

Step 4: Continue folding same sides in to the center.  My napkin was folded towards the center 4 times but it may vary depending on the size napkin you are using.  You don't want it to be too skinny when done or it will not hold the egg well.


Step 5:  Fold both folds together.  This is where the clothespin comes in handy to hold it all together while you grab your egg.  If you wish to hold it by hand you can skip the clothespin its just easier for photos to have the clothespin as a 3rd hand.


Step 6:  Place the egg in the center and fold napkin around it to form the ears.  Be sure to have the opening show and point at the top.  The clothespin will help hold the egg and napkin in place so you can move on to the next step.

Step 7:  Using ribbon or sting tie a bow securely around the napkin to keep the ears in place.  We suggest that you do NOT use a "knot" in your bow as you will want your guests to have easy access to the napkin for dinner use.

And there you have it.  Easy Peasy, Easter Napkins that match using mismatched napkins. 

I think we will have some happy dinner guests and both of my girls loved helping with this project too so its a good way to get the kids involved in Easter Dinner as well.  They even got out the "fancy" stuff (as the Youngest Daughter called it) for this cute little photo display.   And they remembered the place setting they learned at the Legions Corned Beef Dinner too.  Who knew something as simple as a napkin would teach them so much.

Wednesday, March 21, 2018

Napkins for Easter Dinner


With a guest list of 20 or maybe more we really have no idea who is coming and who is not, Easter dinner is going to be packed at our house and we wouldn't want it any other way.  That also means we will need a ton of napkins too so why not sew enough for everyone then make them part of  the Easter Decorations for that day.


So that was not the intention I had when I started out yesterday.  My intention was a making a new bright and cherry table cloth to welcome in the first day of Spring.  Lets face it the foot plus of snow on the ground and  the 2 degrees we had for a temp was just not a good welcome to spring if you ask me.  While I couldn't fix the conditions outside I did want to spring it up inside.   I dug though the material stash I have until I found the perfect print of flowers, yellow, green blue and of course red as that is a must for my kitchen decor.   Then I set to sewing and then the table cloth was done in no time.  With the extra material I had I also whipped up 8 new napkins to go with it as we prefer cloth napkins in our house.  Its a long expensive story from over 5 years ago but you can read about why the Bull family made the change from paper to cloth napkins at Chicken Napkins Save Money.


Really it took no time at all as its just sewing straight lines and I was done before I even had to head out to work.  While I may have finished the napkins and tablecloth I didn't have time to clean up all the mess before work so all the other material choices I had out and the sewing machine were sitting right where I left them when I got home yesterday.  I really didn't feel like putting it all away at that point so I just decided with so many guests coming to Easter dinner why not make up enough napkins for everyone on the guest list.  It would be worth it in the long run as we wouldn't have to purchase paper napkins for Easter and we wouldn't have to wait till I had the time to make up more next time we need new ones.  I have to be in the mood to sew to actually get out the machine and sew so sometimes we go a while using rattly, torn up, thing napkins.

Unfortunately I did not have enough of each material to make all 20+ napkins match each other but the Oldest Daughter came up with a solution for that and even help them go a little better with our plates that they definitely didn't match too....Bunny Napkins for everyone!   Even if the napkins are all different colors we can still make them match by making a colorful bunny napkin for every setting.  She really had a great idea here and I'm pretty sure it will work out great given all the different colors of plastic eggs.  Making these guys is pretty simple too.  You can get step by step directions at Bunny Napkins or you can just roll 2 corners of the napkin to the center of the napkin and fold around an egg.  Tie it off with a bow and be done.  Plus it really does make a fun addition to the Easter decor at the table.