Monday, June 13, 2016

A New Addition To The Blog

Quite often lots and lots of things take place for the Bull family that I plan to share with everyone who follows along with us both here and on our facebook page ( The Bull's Pen ) then before I know it time hasn't allowed me to post about it.  Of course then its not "relevant" to whats actually happening "today", whether it was a holiday happening or its rained for a week and it was a sunny day or even with the critters they grow by the seconds so a 4 day old post of them just doesn't make sense. For example when I wanted to share my Mother's Day with everyone and then the Crazy month of May took over and I never got to do it and it just seemed too late.

Solution found, simply a new Page to add to my blog call the " Week In Review" that will allow me to post all the "extra" stuff that happens in a week and that normally I wouldn't be able to share with everyone.  Hope you enjoy seeing all the "extra" stuff.

Here is an example of one of the post that never made it:


The Pigs, did I even mention we had gotten them yet?  Well we did and they are growing and we even had and incident where 2 of the 4 pigs were invisible, missing or really good at hiding and also and indecent with one having a Prolapsed Rectum....I'll spare you the details but She is fine and the Hubby now has experience in that department that I don't ever want to know the details of. lol


I'm sure I had all intention of posting it but then it was again too late to say look at the Piglets when we had them over a month already and they are not cute little piggies now but big stinky, muddy messes.  I will mention that is girl in the picture is the one who had the bottom problem and guess what her name is?  Black Bob  For real the Big Guy wanted to name one Bob and since we already had a pig named Bob he changed this one to "Black" Bob since she was the one that had the most black on it.  Apparently at 7yrs old you don't care that a girl shouldn't be named Bob either because he is determined that is her name so that's what it is.


Thursday, June 9, 2016

Musical Fairy Garden Set

The Oldest Daughter, now 10yrs old has decided to take up a job and raise her own money.  While I am very proud of her (that will be another blog post) this is more about how I helped her today with that job.  Her job of choice is selling miniature Fairy Gardens.  Most of the time she makes all her own accessories, whether its a painted rock house, a garden banner, or even a rope swing.  Sometimes she will ask me for a little help to make them "fancy" or "pretty" or so on and I do what I can to help but she really doesn't need much of my help.  Honestly, I'm sort of jealous of her job, its so fun, its like being a kid again playing with doll houses and I just love helping her when she lets me.
I'm so proud of her for everything she had done so far and I really love how she enjoys it all.  Yesterday she came home with an order of 6 more teacup sets, WOW!  Thankfully one of them did not need to be ready till Friday so that left a little breathing room but it was for a special person, her music teacher.  She was determined to make a "musical" themed one but she was also determined to go to her best friends birthday party so the time to put it all together was going to be limited on Thursday night.
Since she has worked very hard with her fairy garden business I decided to help her out and surprise her with a few musical instruments that she can use in her fairy garden.

When I first thought about making them I thought it was going to be so easy and I would just whip them right up and be done.....Of course not, I spent half the day working on them but I'm finally satisfied.  All that was left was the wait till she returns from the birthday party to see what she thinks of them.

The hardest one that I made has to be the Harp.  I loved all the pretty harps on Pintrest (my idea source) but I sure as heck couldn't make one even close to the ones I was seeing.  Thinking I was just using the wrong type of branches I went out in search of a a different kind.  Apple tress seem to have the best textures and shapes so finally I was able to come up with something I liked.


Although I glued all the parts together I also added to straight pins to the top branch to keep it together till the glue dries.  I think I will also put moss around the those areas to hide the connecting areas but I wasn't sure yet if the "Business Girl" would like it our not so I will wait an see?
As for the block base that its all attached to was from a wreath project I did and I just drilled it out and stuck the stick inside it for stability.   Unfortunately, the strings are a bit lopsided but I didn't notice that till I took this picture so maybe its just the angle of the camera. lol


On the other hand the Pan Flute was probably the easiest instrument that I made.  I used Bar-B-Que skewers all just cut at random lengths and glued together from shortest to tallest.  I glued another piece across them to hold the shape and then weaved a little thread between the sticks for decoration.  Oh and the tassel that is just a few looped threads tied off and attached.


The banjo/guitar or what every stringed instrument a fairy would want to play was another tough one to figure out.  The wooden disc was simple as I had the from other projects once I found the right thickness.  Attaching the arm was a pretty easy as I just drilled a small hole in it and stuck a branch in it.  The strings were the problem.  I tried to attach them to the sides on pins but it just didn't look right.  Finally decided to attach them to the top and it worked great.  Just a balled straight pin shoved as far into the stick as I could and bent over, worked like a charm.


The drum set was pretty easy too.  I just cut a wine cork in half, added some white fabric in a circular shape and then glued it in place.  For the sides I used the same black thread as on the stringed instruments and sewed around it.  It doesn't really "hold" the cloth as the glue does that but it looks good.
The drum sticks are simply left over from the flute with some of the same white fabric as on the drum glued to it.  Again the black string is not "holding" the fabric as its glued into place but it gives it that finished look.


All and all, I love how they turned out.  Guess what she did too <3 and I'm sure that her teacher will love what she created for her too.  I love how she arranged them in the teacup set after she got home from her friends birthday party too.  I was not going to do it like this at all but it worked out great the way she did it.  Guess she is better at her job then I am.


Sunday, June 5, 2016

Garden 2016 Is Planted Finally!


Although it was weeks later then normal we finally got the garden planted for the 2016 harvest year.
Not much has changed in the garden this year other then addition of one small 3' X 3' bed to grow more onions in.  Oh and the Green House, we added that this year but it was a bit late to actually start many seeds in it.  We did have some cucumbers that we started in it but that was about it other then flowers this year.


Not much of a major addition to the garden but it was very worth filling in this small space and we actually only had one small bed for onions so this was perfect to grow us a few more.


We also added one other thing to the garden that we normally don't have, fencing for the pumpkins/gourds to grow on.  We usually just let them grow along the edge of the garden fences but the chickens and goats discover them and then we don't have any come harvest time.  We are hoping that moving inside the garden on the fencing will give us a bit more then the three we harvested last year.


Guess moving the potato bed was out of the question this year.  With being so far behind in planting this year we have quiet a few potatoes we missed last year sprout up and grow before we had time to till beds.  With so many already sprouting we just tilled up the rows and added more.  Of course if you are not familiar with us you will not know that most of our potatoes grow in a different area outside the garden anyway so should they not grow we will still have a backup crop.


I really can not believe just how quickly things happen in the garden.  Two weeks ago nothing was even planted and today we have seedlings sprouting in almost every bed.  Here is hoping we have a great harvest.

Fairy/Gnome Gardens Update


My kids worked very hard to get the supplies together to make Fairy/Gnome Gardens in 4-H.  It was a project the Oldest Daughter wanted to do the worst way and knowing we couldn't afford them as a club she and the other kids put lots of work into making all the supplies we would need.  You can see just some of the great items we made in my Fairy/Gnome Garden blog but I also wanted to share some of the great completed gardens made by the 4-H kids using those great items.


Here are some more fun items and some of the completed Fairy/Gnome Gardens that Team Clover 4-H Club made.  Each garden turned out great and shows the different personalities of all the members.
See if you can find any of these items in the gardens below.
Fair Laundry Line, Rock Sculptures, Tire Swings, Koi Ponds, Table and Chair set and much more......


DIY Hummingbird Feeders

More 4-H Bird watching fun with our DIY Hummingbird feeders

Team Clover 4-H has spent the last year learning lots of ways to care for wild birds and now that summer is here we have taken on the challenge of caring for summer feathered friends.  We made bird baths, bird house and at our last meeting we made Hummingbird feeders.

Think you may want to give it a try?  Here is how we made ours


Supplies you will need to make your own are:

Recycled bottles           Bed spring or heavy gauge wire         18 Gague Wire for attaching
Pliers                               Beads                                                   Buttons
Hummingbird feeder tube with stopper                                    Hummingbird food


Step 1:  We started with a recycled bottle and an old bed spring.  Our springs had to be sprung (stretched) a bit to fit each bottle so some adjustments may be required.
For the safety of the Hummingbirds we thoroughly cleaned the inside and then cleaned all the labels and glue off it (Hot water and a Brillo pad worked great for that).  The sky is the limit with which bottles you can use but be sure to check with your stopper as to the size of the opening.  There are also many fun shapes of bottles to choose from as you will see in our completed photos just keep in mind the larger the bottle the more weight there will be on the stopper and it may leak.  We found regular wine bottles and smaller to work the best.
Not everyone has access to bed springs so a heavy gauge wire will work as well but test it before you try as the weight of the liquid will effect the end result.  The thinner the wire the more loops you will need to make and too thin of wire will just not work well in a coil method.  We choose to decorate our feeders with buttons and beads but you could easily just paint the bottles or both, which every you choose.

18 Gauge wire.
Two lengths approximately 24" long

Step 2:  To make it possible to hang the feeders we took our 18 Gauge wire cut two lengths about 24" long and folded it in half.  To create the loop we twisted the wire approximately two inches from the fold leaving us a nice loop and four arms to decorate with the buttons, beads or both.  Once the arms are decorated we then attached them to the spring.  I recommend decorating them one wire at a time then attach as it is hard to keep them on all four wires with out losing some during attaching (yes we found out the hard way on a few bottles).  The design and length of each set of beads is set by the design you are trying to reach and will also determine the "spring" design on the bottle.  If you want lots of the bed spring showing on the bottle then less beads/wire is required.  Just be sure that you have enough of the bed spring on the bottle to prevent it from tipping out. To attach the wire to the bed spring we simply coiled the wires around the spring a few times for strength and clipped any extra off with pliers.


Close up of stopper.  Be sure it fits snugly
to prevent leaking.


Step 3:  Simply fill feeders with Hummingbird food and insert the Hummingbird feeder tube with stopper and just that easy you have one pretty awesome Hummingbird feeder.


This was a bit of a larger square shaped bottle so the spring did not fit snugly on it but it still worked out very well.
Step 4:  Wait for the Hummingbirds.  Luckily for us we already had some in our area that were fighting over one feeder so they were quick to flock to all the others we have now.  And as you can tell by the liquid level the one pictured above its one of the favorites as it has only been up a little over a week.

Hummingbird perched high atop an electrical wire scanning its territory to keep others from its new feeders.


*Side Note*
Plan blog on sunny days and not in downpours as I have waited 3 hours now and not seen the hummingbird once to get a picture of it at the feeders.....Go figure. lol


Monday, May 16, 2016

Bird Baths

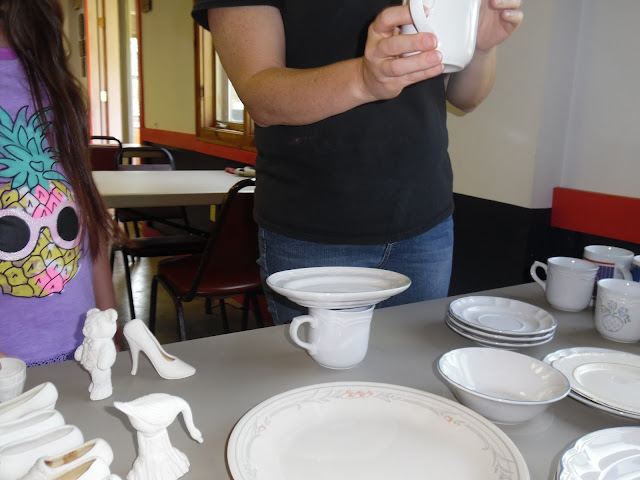
So what do you do with a pile of old mismatched dishes and your 4-H club is learning about caring for wild birds......Make up-cycle bird baths of course!

My kids completed 4-H bird baths.

Okay it wasn't like I had a huge pile of dishes laying around and I thought this up all on my own.  It was more of a case of we are learning about caring for "Wild Birds" in 4-H this year and not that the temps are warmer why not do a bird bath.  So after searching my favorite place to find project ideas or better known as Pintrest I saw a bird bath made up of dishes mismatch dishes and thought...LOVE it!

Dishes, vases and figurines to choose from

So where did all the dishes come from....A few family members and Skippy's Flea Market another great business who donated to our club.  When we were all done we had a pile of mismatched dishes, vases, and ceramic figures to use.

Glued together with easy and quick super glue for fast results


We glued them all together with plain old Super Glue some dishwasher safe glass super glue and even Gorilla super glue....It was quite a variety.  Seriously, I tried a ton of different glue in my practice attempts and while some worked great they took way too long to adhere, some even took over 24hours to adhere and we needed a "quick stick" so we could finish our projects in one day.  Quick dry super glue seemed to work the best for that.

Variety of types of dishes made for some fun personalized bird baths


Now not all the dishes were the same design, colors or even even close in shape.  We had small vases, large vases, bowls in varying sizes a even plain old coffee mugs but when they were all assembled they already looked quite fun.

Matching them up with spray paint
Next up was making all the mismatched dishes match and the easiest way to do that is spray paint them.  I know there are tons of "glass" paint out there but again we were looking for quick and easy so spray paint it was.  Mother Nature even provided us with a great sunny 80 degree day so it dried even faster.


If your looking for a fun project to do with a group or just on your own I definitely recommend making these.  They are a quick (other then letting the glue dry for a bit) and very easy project, plus you can make them personal to what you need them for too.  We made bird baths because we were learning about birds but I think this one will be used as a cake/cupcake plate.
However I do want to stress that they are quite fragile.  This is the new version of the unpainted one in the first pictures as it was accidentally dropped and shattered so we took new pieces to make another one.  Think I actually like this one better anyway :)

4-H Pheasants

Here it is....Our next big adventure in 4-H. We will be raising pheasants to release to help with the re-population in our area.  Seems like fun but of course its going to be quite a bit of work too. This is also the only project we will be doing this year that involves animals other then the wild birds we built feeders and such for.  Yet here again we are raising "wild" birds.....Fingers crossed all goes smoothly for us.

60+ day old pheasants....WOW!
We started out with quite a batch of babies.......We ordered 70 to raise and release.  I know that sounds absurd for our first attempt but hey came in groups of 35 and knowing already that 24 of them were heading to be raised by our members in town we figured strength in numbers would not work well with just 11 left here so we added the 2nd batch.  Guess it was a good call as by the time they had reached our local 4-H office a few had already passed and a week into this we have also had a few pass too.

Cleaning out the brooder tank for the pheasants and we only had
one escapee to catch...I'm sure it had help "escaping". lol
Its hard work taking care of 30+ pheasants even though they are barely a week old.  The brooder has to be cleaned regularly, they need to be fed and watered daily and other things generally associated with raising of baby animals/bird.
Thankfully for the club, we have regular animal chores to do daily so they will be well taken car of when members can not make it here.  But when the opportunity arrives for members to get a turn you can bet they will.  I will admit that I was a bit surprised when they found out they had to clean the poopy mess in the brooder that they actually were more then willing to do it.  Then later I found out it was more of a case that they got to take a break from the "building" part associated with raising pheasants.

Building the run for the pheasants
Unfortunately for these guys it was cold and snowed on building day (May 15, 2016) which is sort of not normal for our area.  We are cold in May still but we usually don't have snow showers and even a cold morning usually warms up, just not on this day....sorry guys.   But they built anyway and did a splendid job too.  There is still a little tweaking that needs doing to the run, holes to fill in and brush to move in for cover but soon enough the pheasants will be learning the way of the "wild", wit a little human assistance of course.


Now we just have to wait on Mother Nature to warm us up to safe levels for the pheasants and also for them to be big enough not to fit though the netting any guesses on which will happen first????